Was doing grocery shopping last evening and saw the skies lit up with the setting sun.. Felt miserable for not having my DSLR with me at the time.. So took out my mediocre mobile phone, looked for a good composition and stuck to the golden rules and below is the result. No EXIF data as its a pinhole camera with no control over exposure. Wanted to give an immediate subject for creating interest and then I wanted to position the shot to get the light distribution (fading of light) from bottom left to top right (diagonal) where the street light would be more dramatic.
Comments are welcomed and the pics are copyrighted.
Akila.
Friday, March 29, 2013
Wednesday, March 27, 2013
Exploring the shallow depth of field in Macro photography
Depth of field (DOF) is a big challenge any amateur enthusiast
(including myself) faces when getting into photography. Its the illusive
block of focus which varies from lens to lens and from one f number to
the other. I have had numerous shots in the past which I had to regret
about not having enough DOF in the shot. Below is one such case where
the value of this shot would be doubled if I had both these little
fellows in focus (which I didn't notice at the time I shot this),
Things get even more dicey once you step into the domain of macro photography where a low aperture value would give you unbelievably shallow depth of field, which is also hard to notice from the display at the back of ones camera. So, I decided to do a small demo using a watch I bought sometime back to demonstrate what f/2.8 yields in macro level.
In this shot, I attempted to focus on the seconds hand (which proved to be really tricky) and fire away.
There the seconds hand appear tack sharp while the everything else (which is millimeters away) appears blurred and out of focus.
The same shot was then taken by focusing on the dial (with numbers) and it gave this result
Here we see the opposite case where Casio brand name is in focus while few millimeters in front, the seconds hand is off focus.
Hope everyone who is getting into macro photography will find this useful and please feel free to discuss any related issues below.
*** Thanks Duane Jacques for suggesting I make a small article about this while we were discussing shallow DOF issues.
Akila.
Shot at f/5.6 and at 1/320 sec.
Things get even more dicey once you step into the domain of macro photography where a low aperture value would give you unbelievably shallow depth of field, which is also hard to notice from the display at the back of ones camera. So, I decided to do a small demo using a watch I bought sometime back to demonstrate what f/2.8 yields in macro level.
In this shot, I attempted to focus on the seconds hand (which proved to be really tricky) and fire away.
There the seconds hand appear tack sharp while the everything else (which is millimeters away) appears blurred and out of focus.
The same shot was then taken by focusing on the dial (with numbers) and it gave this result
Here we see the opposite case where Casio brand name is in focus while few millimeters in front, the seconds hand is off focus.
Hope everyone who is getting into macro photography will find this useful and please feel free to discuss any related issues below.
*** Thanks Duane Jacques for suggesting I make a small article about this while we were discussing shallow DOF issues.
Akila.
Sunday, March 24, 2013
The holy grail shot of Macro photography...
All pics are copyrighted.
Comments are highly welcomed.
Akila
Starting out on MACRO Photography..
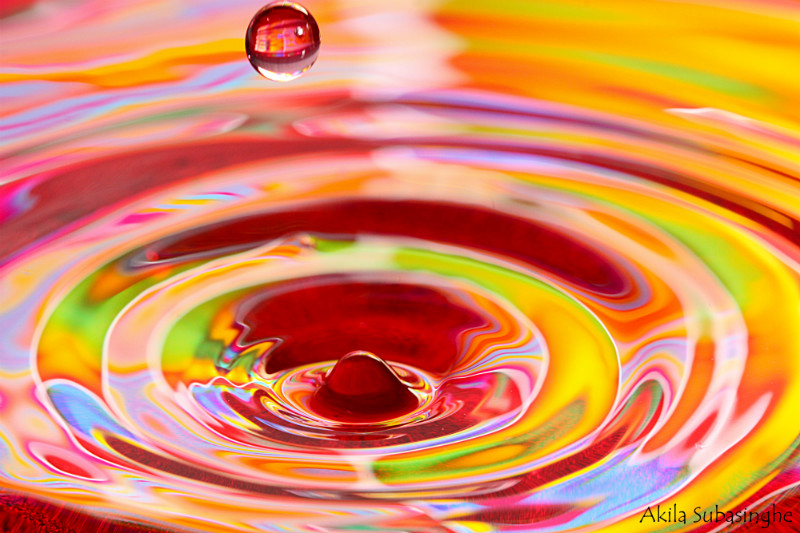
1) Small stationary objects - Model cars, water droplet shots, patterns and textures
You need not spend much for this type of shots. Reversal rings were not that attractive for me. But there are two other cheap options for macros. One is called "Close up filters"....they are just like the UV filter that goes in front of your lens which acts like a magnifying glass (price $20-99). They do give you fast shutter speeds (So can be tried out on bugs even), but don't give you the best picture quality as far as sharpness is concerned. The second solution is a set of extension tubes ($35-250). A cheap knock off brand would cost you around $40. These are simply hollow tubes, so need not worry about optical qualities. They just places your lens far from the sensor and thus giving your the macro ability. When buying, its always important to purchase some tubes with autofocus capabilities...which can electrically connect your lens with the body. The down side is, you lose light. The amount depends on how long the extension tube/s are. Works great for still objects, but with bugs, you may need a ring flash to get faster shutter speeds.
2) Insect photography - Butterflies, bugs etc...
This is a totally different beast altogether. The two options I mentioned above would still work here, but would have very limited applicability. Mainly because for both methods, the end of your lens needs to be so close to the bug, you will be literally breathing down its neck. So, shy insects will be out of your reach. This is where you have to spend some good bucks to get a descent lens. I myself is a Canon shooter, so very limited knowledge about Nikor lenses. Always keep an eye for third party lenses made by Sigma, Tamron etc... The only thing you need to pay attention is about the focal length. The longer the focal length, the further away from the subject you ll be shooting from...so less chances of scaring it away. + Its always great to have IS or VR to minimize camera shake. Not a critical factor, but will help.
In my personal opinion, its always best to start with something cheap. Extension tubes and a ring flash would not cost you more than a $100 (unless you go for high end brands).. and will let you know if you are up for it or not. As I understand, its not everyone's cup of tea...Certainly is mine though.
Here are two sample shots I have taken last summer without a dedicated macro lens.
Shot 1 - Taken with a Vivitar close up filter (10X) on my telephoto lens. Shot with natural (harsh) daylight.
Shot 2 - Taken with a knock off extension tube set (31+12 mm) on my 50mm 1.8 portrait lens. Shot with natural (harsh) daylight.
The only requirement was pure GUTS to stand that close to these bees while almost touching them with the lens (specially with the second shot) :D
PS - Can provide links for those interested in buying these stuff.
Akila.
Monday, March 11, 2013
I did this shoot sometime back.. First let me present the outcome and then describe what it is.
Most would not be able to guess what this is apart from the fact these are water droplets....Oh! Believe I gave it away with the title of this post. During the winter, I was exploring indoors for a shot and saw a snow globe and the water droplets formed on top of it. Here s how it looked like.
Pretty boring ha? Not for me! :). So, there we go... carefully moved it a desk...Used two colored LED lights (From a dollar shop) and pointed the lights from either side of the globe from below. Didn't have a descent tripod..so took this handheld at f/5.6. Also used extension tubes to get close up (No macro lens :D).... and snapped away...!
All copyrights reserved for the images.
Akila.
Subscribe to:
Posts (Atom)